Tip of the Month
- Batch Updating Assessment Due Dates
-
You can batch change the dates on your rolled over assessments via the batch edit option within Ultra courses. Click on the ellipses found in the upper right-hand side of the Course Content page, usually found below the Student Preview button (or below the course banner image if you have added one). On the window that pops up use the checkboxes to select the relevant assessments. Click on the Options drop-down in the bottom right-hand corner of the page and select Edit dates. You will then have two options for editing your due dates:
- Change dates based on course start: start by adding the previous start for the course and the new start date. Batch Edit will then automatically adjust the due dates using the number of days between the two start dates.
- Change dates by number of days: use the Shift dates forward or Shift dates backward fields to adjust your due dates by a certain number of days.
More guidance on this can be found on the Blackboard Support pages.
Ultra Course View Tips and Showcase
- Student Activity in Ultra Courses
-
It is possible to look at data relating to certain types of student activity in Ultra courses, such as their interactions with Blackboard assessments and tests, which can help with being able to anticipate and therefore maybe improve student grades.
Student Activity in Blackboard Assessments and Tests
When clicking on the ellipses to the right of any Blackboard assessment or test you will see a Student Activity menu item. This item provides some aggregate information on the assessment or test in question, such as for example how many students have looked at the feedback they have been provided or what the average class submission time is. You can also look at an individual student’s activity, such as the amount of time it took them to complete the assessment or test.
More information about the Student Activity item, as well as advice on how to access data for other Blackboard tools, such as Discussions, can be found on the Blackboard Help pages.
Course Activity Related to Grades
In an Ultra course the Course Activity Related to Grades report allows you to view how active your students are in your course materials. There are two different ways to access this report:
- From the Activity Stream on the base navigation: alerts concerning student activity within different courses can be seen from the Activity Stream. Clicking on these alerts will open the Course Activity Related to Grades report.
- From the Grades page on the base navigation: after clicking on this page click on the grade pill that displays the average grade in your course. Select the Course Activity Related to Grades report icon.
More information about the Course Activity Related to Grades report, the student activity it looks at, the data it generates and how to read it can be found on the Blackboard Help pages.
- Using Keyboard Navigation to Move Content
-
In Ultra Course View, there is another way to move content around instead of clicking and dragging to the correct location. This is by using the keyboard navigation shortcuts and can save time if you are using your laptop’s trackpad instead of a mouse. To activate keyboard navigation:
- Enter the relevant course area and click the tab button on your keyboard. It may be subtle, but you should see an area on the screen appear highlighted by a box.
- Continue to press the tab button until you reach the double-arrow icon next to the item you wish to move.

- Once this is highlighted, click the Enter button on your keyboard to select it.
- You can now use the up and down arrows on your keyboard to move the item to the preferred location. Click enter again to confirm its location.

- Copying Content
-
If you wish to reuse learning material across Ultra courses, you can copy it from one to another, as long as you are enrolled in both. To copy content, look for the ellipsis icon (three little dots) at the top right of the content area and select Copy Content. For full details, follow the advice given on the Blackboard Help Pages.
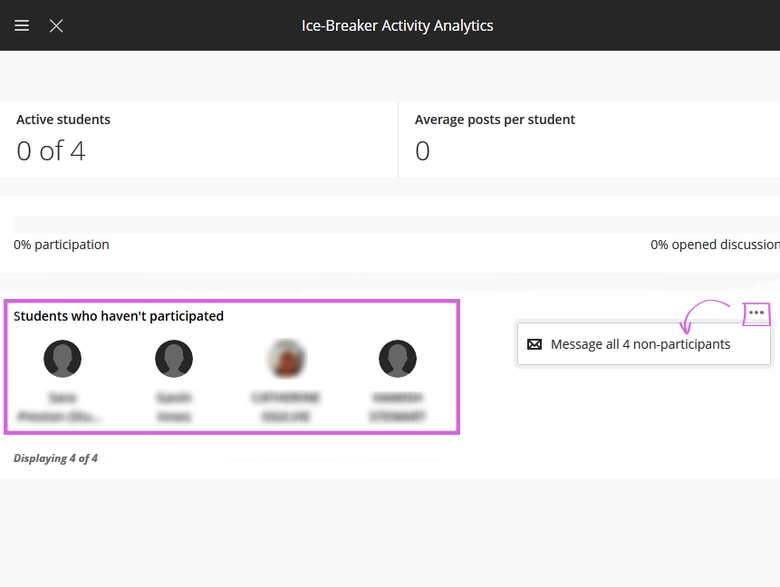
- Discussion Analytics
-
Easily identify which of your students have not participated in a discussion activity, by visiting the Discussions tab within the course page (upper right-hand corner), select the ellipsis next to your discussion and choose View Analytics. From there, you can also send the students a message asking if they require any support by selecting the ellipsis on the right hand side.
- Conditional Availability
-
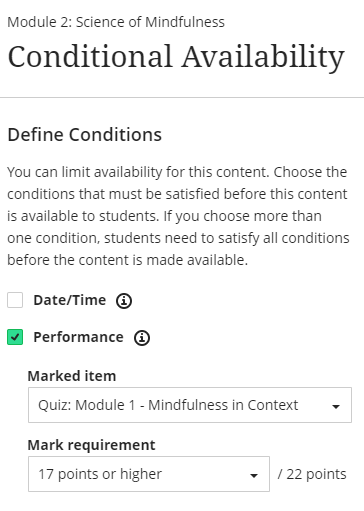
Conditional Availability
In order to create a course that is more interactive and customisable to your requirements you can use Conditional Availability. This is something that was broadly done for the online course Discovering Mindfulness (Learning).
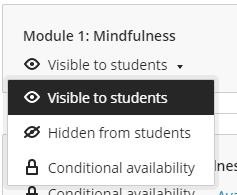
On the Course Content page for any item that you create there are 3 options for students’ visibility: Visible to students, Hidden from students or Conditional availability.
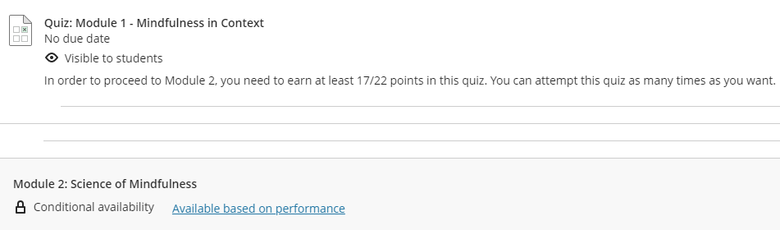
For the aforementioned course, which is divided into six modules, students have access to modules 2-6 only if they have achieved a specific mark at the end of each module. Then they can move forward to the next module.
There are two ways of setting the Conditional Availability for your course, either by Date or by Performance. For Discovering Mindfulness (Learning) this was set only by Performance.

Release content based on Performance
If you choose the Performance option, you can release an item or folder depending on the students’ performance. For example, you might want the students to gain a specific mark in a test before they are able to see the next materials in the content area.
Release content based on Date
If you choose the Date option, you can release a specific item or folder on an exact date or for a specific period of time.

Visibility Settings
Finally, when you set up the Conditional Availability you can also manage the Visibility Settings, by making an item either Visible to students or Hidden from their view.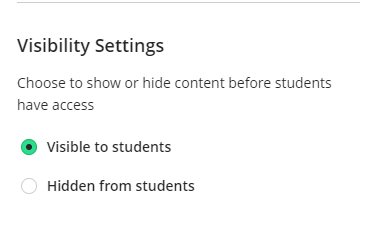
- Visible to students: You can show the item to the students before they are able to access it. In this case the students will be able to see either the dates that the item will be available or the information about their access based on their performance.

- Hidden from students: This option hides the item from students’ view in the Course Content area and they can access it only when the Performance or the Date requirements are achieved.
- Conversations and Groups
-
Conversations and group work
The Designing & Tutoring Online Course (DTOC) is a five-week course which was created to support staff teaching online courses, whilst also allowing them to experience studying online as a student. A key component of this experience is the use of group work. The April 2019 cohort were the first to take this course in the new Ultra Course View (UCV), which allowed us to make use of the Conversation tool present in UCV.
What are Conversations?
Conversations is a new tool available in the Ultra Course View, which can be enabled for individual content items or assessments within the course area. It provides students with a synchronous (Collaborate room) and an asynchronous (Conversations) communication space, which appears only in the relevant content, and which can be used to ask for help, share resources or answer any questions others might have.
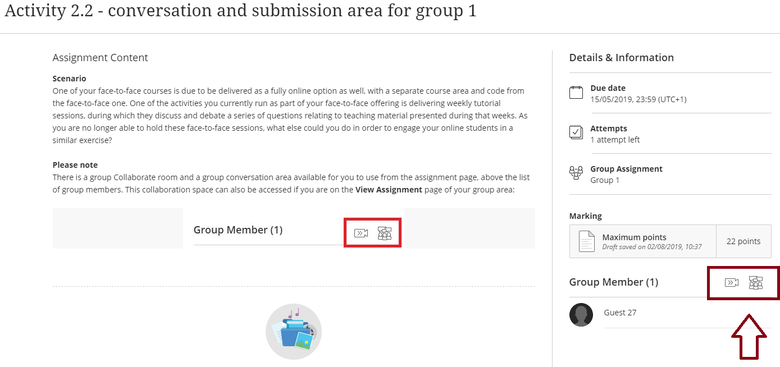
Within DTOC, the tool was used as part of a group submission.
Benefits and Challenges
Staff engagement was good, and they used the tool to collaboratively work on their document submissions, schedule and attend Collaborate sessions, provide feedback to each other, as well as for more light-hearted discussions. We received timely submission from all groups, the quality of the work was very good, and they all seemed to be able to access their feedback.
As with any new tool, there were some challenges encountered.
Finding and accessing the area caused some issues for staff. Although written instructions for access were provided, we learnt that a video guide would have been more useful, and plan on adding one for the next run of the course.
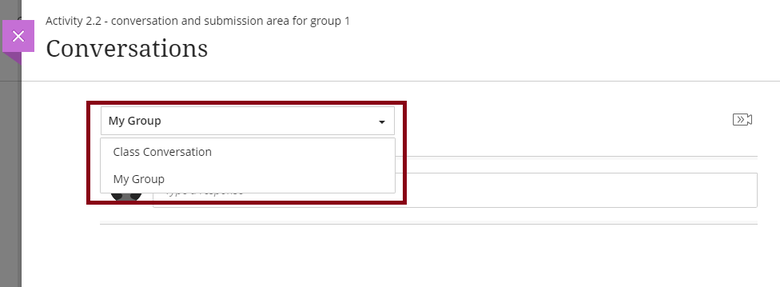
The Conversation tool provides two asynchronous conversation areas to engage with, one visible just to members of a group (for group assignments only), and one visible to the entire class. Depending on which way they opened the Conversation tab, staff could be taken to one or the other, which did cause some confusion, with staff being unable initially to communicate with their peers. More work needs to be done in ensuring staff and students are well aware of how to use this tool, and the aforementioned video will be used to help with that as well.
As with any group work, there were challenges with finding suitable times for collaboration and with getting the tool to work. Although frustrating, this is a good way for staff to experience first-hand what their online students go through when they have group work activities to engage with.

- Using Learning Modules
-
Structuring your course using learning modules
Learning modules are at the heart of the design for the online course NE Scotland: History, Landscape, Culture and Economy.
The content of the course is divided into four topics: ‘History and Archaeology’, ‘Landscape’, ‘Culture and Identity’ and ‘North-East Scotland Today’. Each main topic is then further divided into folder subtopics, with each folder containing a mixture of mini-lecture documents, video or audio media, reading lists and a quiz to round-up each subtopic.
Horizontal NavigationLearning modules were an efficient and visually appealing way of structuring this content, whilst allowing students to easily navigate the material within each topic and subtopic, without having to come out of various folders. This is possible due to learning modules having a horizontal navigation option.
For example, a student can go into the History and Archaeology topic, and then into the Castles of the North-East subtopic folder. They can start their learning by reading the mini-lecture document in the folder and then can easily proceed through the rest of the content by using the navigation arrows found at the top of the page. This creates a narrative throughout the material for this subtopic and provides students with a more seamless experience through the content.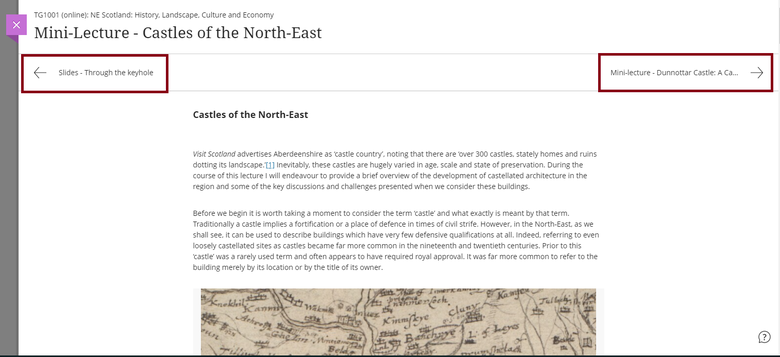
Sequential viewing
Should the need ever arise, all the learning modules can have sequential viewing enabled, with content being available to students as they complete steps in a sequence. As the course might expand in the future, this feature would be useful to teaching staff that require their content to be viewed and completed in a specific order, whilst still ensuring the format of the learning material is in line with the rest of the course.
It also provides students with a visual indication that they have engaged with the learning material.
Teaching and Learning Guidance
- Share camera in Collaborate
-
If you have a presenter or moderator role in a Collaborate session, the Share Camera option available from the Share Content panel allows you to share a camera feed, such as your webcam or a visualiser, in full screen with everyone in the session, including you. Your camera can be displayed as the main content, in the same way as the whiteboard, files or screenshare.

- Release Conditions in Ultra and Original Courses
-
Ultra Course View
From mid-April 2021 course coordinators will be able to make content items visible to specific students or groups, in addition to using the existing conditional availability rules based on date/time and performance. To set up the release conditions for an item in your course, select Release conditions from the item visibility dropdown menu.
Original Course View
In the Original Course View you can use adaptive release to determine when and who can see your content. You can either use basic adaptive release, to apply one rule to an item, or advanced adaptive release for more complex release criteria.
- How to Use the Recycle Bin in Panopto
-
If you are missing recordings from a Panopto folder they have perhaps been moved to the Recycle Bin. In Panopto, deleted recordings will be stored in a Recycle Bin for 90 days, after which they will be permanently deleted. Users can access the Recycle Bin and restore any recordings needed. Steps on how to do this can be found on the Panopto Support site.
- Teaching and Learning Advent Calendar
-
Look for inspiration on learning and teaching practices using the advent calendar below, created by Nottingham Trent University:
- Best Practices for Engaging Students Online
-
Engaging and motivating online students requires creativity, flexibility and new practices. Check out the infographic linked below for 10 ways to engage your students online.
- Troubleshooting Basic Audio Problems in Blackboard Collaborate
-
What can I do when can't hear others in Collaborate?
-
Are you using Google Chrome? If not, close the session and join again in Google Chrome
-
When joining a Collaborate session, make sure to allow your browser access to your microphone, even if you are not planning to speak
-
Check that the speaker or headphone volume is not on mute or low on your computer
-
Check that the speaker volume is not down within My Settings in Collaborate
-
Try playing a YouTube video, if you can hear, then the issue is not with your speakers or headphones. Try exiting the Collaborate session and joining again
What can I do when others can't hear me in Collaborate?
-
Are you using Google Chrome? If not, close the session and join again in Google Chrome
-
When joining a Collaborate session, make sure to allow your browser access to your microphone
-
Have you turned on your microphone? A line through the microphone icon at the bottom of the Collaborate screen means that the microphone is off
-
You can run through the audio and video set up again from My Settings. Check that you have the correct microphone selected
-
- Panopto Analytics
-
Panopto Analytics
Panopto is the University's video capture and hosting system provider. While it is mainly utilized as a lecture capture system, it is also widely used to create other types of course materials such as course introductions, short PowerPoint presentations and software demonstrations as well as video feedback for assignments.
In addition to creating and hosting videos, Panopto enables content creators to gain insight into their audience's behaviour by providing video analytics both on a folder level and for individual session (video).
In general, the video analytics data can reveal levels of engagement by such as number of views, minutes watched and comments. It is also possible to drill down to individual users, provided they have been logged in when accessing a session/video. All of the above and even more can provide a great insight into how the videos are utilized in general.
Learn more about folders and session level statistics from the Panopto website.
- Course Accessibility Report
-
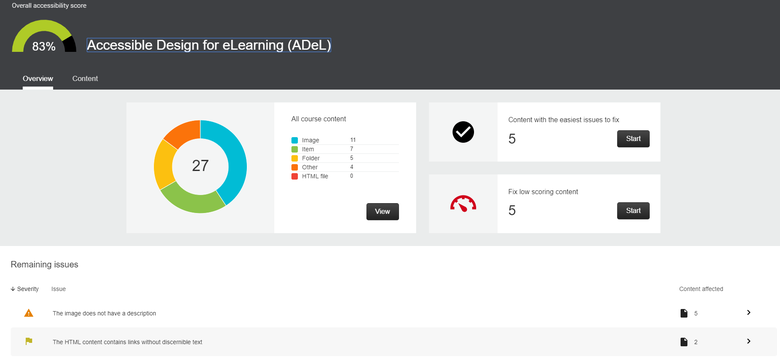
Course Accessibility Report
Many of you will already be familiar with Ally, Blackboard’s own tool that measures the accessibility of files in your course area and provides alternative formats to your students. However, Ally can also provide an overall summary of your course’s accessibility via the Course Accessibility Report.
Where can I find the Course Accessibility Report?
If your course is in Original, you will find the Accessibility Report under Course Tools, in the Control Panel.
In Ultra courses, under the Details & Actions menu, clicking on Books & Tools will open up a new layer where you can find the Accessibility Report.
What does the Course Accessibility Report show me?
The report shows you an overview of the accessibility of your course. At the top, you can find the overall accessibility score of your course. A pie chart displays all the content organised by type. The report highlights which content has the easiest issues to fix, as well as the lowest scoring content across your course, and gives you the chance to fix it directly from the tool (rather than having to
find the item in your course area). Finally, you can also view the whole list of the content items in your course and organise them by accessibility score, so that you know what needs to be fixed sooner.
- Six Tips for the Start of the New Academic Year - 2019/20
-
Can you access your 2019-20 courses?
Ensure all the courses you are teaching appear in your Courses tab on MyAberdeen. If any of your courses are missing, first check with your School admin officers to see if they can add you to the area. If they are unable to do so or the area does not exist, please contact the eLearning team.
Remember, you can naviagte your courses by term. The default option will be Current Courses which will show courses listed in the current term.
Is your course open to students?
Remember to open your course or ‘make it available’ to your students when you are ready for them to access your the area. Also remember to 'make your content visible’ or ‘unhide’ the content if appropriate. Only the Course Coordinator has the relevant permission to open courses.
Both Original and Ultra courses can be opened from the base navigation menu. Simply go to the Courses tab and click on the ellipses to the right of the course title, then select Open course.

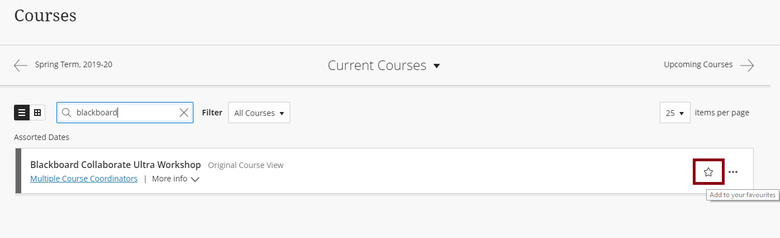
Favourite your courses
Use the ‘favourite’ function on the Base Navigation to make it easier to find the courses you are teaching on MyAberdeen. Simply go to the Courses tab and click on the star icon to the right of the courses you want to mark as a favourite. This will then push these courses to the top of your list and you can click the icon again to deselect the favourite.
Collapsing course menu – Original courses
Please be aware that the left-hand menu in Original course areas is collapsible. If you or your students cannot see the left-hand menu, click the right pointing arrow highlighted in the image below.

Using PowerPoint at the lectern
If you wish to view your PowerPoint slide notes in the classroom whilst your students see only the slides, you can use a keyboard shortcut to switch views since the computer sees the monitor and projector as two separate displays. Pressing the “Windows Logo Key + P” on the keyboard allows the lecturer to change the option from Duplicate to Extended Desktop and then start your slide show. The presenter view with slide notes can now be viewed on the PC monitor by the lecturer whilst the students see the slides as normal on the projector. To switch back to the original view, use Windows Logo Key + P and select Duplicate. For more keyboard shortcuts, have a look at the Microsoft web site.
Find out about new features and changes
Remember to come back to our News page every month, where you can check on any new content or functionality added to MyAberdeen as part of the monthly updates. You can also check this page to see if there are any known issues with using MyAberdeen and how to work around these.
- Problem-Based Learning
-
Problem-based learning
Problem-based learning, or PBL, is a style of active learning, where real-world issues or problems are used to increase knowledge and understanding. It involves students working in groups to solve a problem or a scenario, which can be facilitated by teaching staff. It is a student-centred approach, and it is up to the students to decide what they already know and what they need to learn in order to complete the exercise.
How does PBL work?
The structure can vary, depending on the subject area and what the instructor wants to achieve with the exercise, but it normally follows the same seven steps, in which groups of students are given a scenario or problem to work on, for which they have to:
- Discuss the scenario and make sure everyone understands the problem
- Identify the questions and issues that need addressing
- Brainstorm what the group already knows and formulate some initial solutions
- Structure the results of the brainstorming session
- Formulate objectives for the knowledge that is still lacking (i.e. what needs researching, who will do it, etc.)
- Do independent study and research
- Discuss the findings and finalise your solution
The initial five steps are usually done during the first tutorial meeting and can be supervised by a member of the teaching team. The last steps are normally covered and addressed during a second tutorial session.
This work is sometimes done based on roles, which students assign to themselves and which can be adapted depending on the task, such as scribe, tutor, chair and/or group member. More about these roles can be found in the PBL article written by Diana F Wood in the British Medical Journal.Benefits and challenges
When designed properly, problem-based learning provides students with an authentic learning experience by allowing them to apply and improve their skills and knowledge through real-world scenarios.
Alongside the acquisition of knowledge, there are many other skills that are developed during problem-based learning scenarios, such as the ability to:
- analyse complex issues
- gather, record, critically evaluate and structure information
- work in a team, cooperating and respecting other's views
- lead groups and discussions
- chair a group
- engage in self-directed learning
- improve presentation skills
Problem-based learning also provides students with an authentic learning experience
PBL is not without its challenges, and it’s important that these are kept in mind when designing these activities:
- Writing up effective and rich scenarios can be time consuming but is key in ensuring a good and meaningful experience for students.
- Groups can be dysfunctional, with some students having a more dominant character, thus making it more difficult for the others to effectively engage with the activity.
- Assessment methods need to be tied in with PBL, for it to work more effectively. If assessments focus solely on recalling information, then there might be less incentive for students to actively participate in solving PBL scenarios.
- Failing to solve a PBL scenarios is not necessarily a bad thing. Allowing students to experience both success and setback will not only better prepare them for work life outside their studies, but will still allow them to acquire new knowledge in their quest for finding a solution. Coming back to this problem once they have acquired more knowledge and skills throughout their course would offer them a new perspective.
For those interested in knowing more about PBL, have a look at Maastricht University, who almost exclusively teach using PBL. Advance HE also have numerous case studies, spread across disciplines, looking at the use of PBL.
- Why Accessibility Matters
-
Accessibility
Thursday 16 May 2019 marked the eight Global Accessibility Awareness Day (GAAD). In celebration of this, we would like to encourage you to take some time this month and consider how you could make your teaching more accessible. Also make sure to read our accessibility tip of the month, which will be a recurring section in each month's News page.
Why is accessibility important?
In accordance with the Equality Act 2010, education providers must not treat a disabled person less favourably for any reason that relates to the person’s disability. An educational provider is also required to make any reasonable adjustments in order to allow a disabled learner to successfully participate in a course. We all have a responsibility and a role to play in ensuring the University is in keeping with this legislation.
According to disability charity Scope UK, there are 13.9 million disabled people in the UK alone, and this includes those with visual, motor, hearing, cognitive disabilities and specific learning differences, such as dyslexia. Taking a proactive or reactive approach to creating accessible content will help provide equal opportunities to all students, and work towards creating an inclusive campus.
What can I do?
There are some simple things you can do to try and ensure your teaching is a bit more accessible:
- Ensure your documents are appropriately formatted, by using correct heading styles, providing alt text for images and providing meaningful text to links. The eLearning team have created a template for Word documents that you can use.
- There are workshops you can attend for more training, by visiting the Course Booking page, or you can take one of the free courses on the Percipio website and work in your own time and at your own pace. Alternatively, you can visit the Toolkit for a wealth of advice and resources on how to make your teaching material more accessible.
- Familiarise yourself with Ally, as it can not only help you improve the accessibility of your teaching material, but it also provides students with a variety of alternative accessible formats to uploaded teaching materials, such as electronic braille or audio.
- Consider captioning your video content, which will not only benefit students with audio impairments, but also those whose first language is not English. There is a free captioning tool available within Panopto, and the eLearning team can help you get started with it.
- Know who to contact:
- eLearning team or TAD for help creating accessible content, or any queries regarding digital accessibility
- The Disability Service, which provides advice, information and practical support to all students with a disability, impairment, medical or health condition, or specific learning differences, such as dyslexia
Accessibility Tips
- Adding Audio Descriptions to Panopto Content
-
Audio descriptions can be added to videos on Panopto to improve accessibility for users with a visual impairment. Description is needed to provide the important visual information to people who are blind and listen to the video. Step-by-step instructions are available on the Panopto support site.
- Text to Speech in Word
-
Using the University’s Office 365 version of Word you can now transform Speech to Text – see Dictate your documents in Word . This could be very useful for those who have difficulty typing, prefer to speak ideas out loud or those who’d like to transcribe podcasts.
- Accessibility of Colours for Printing
-
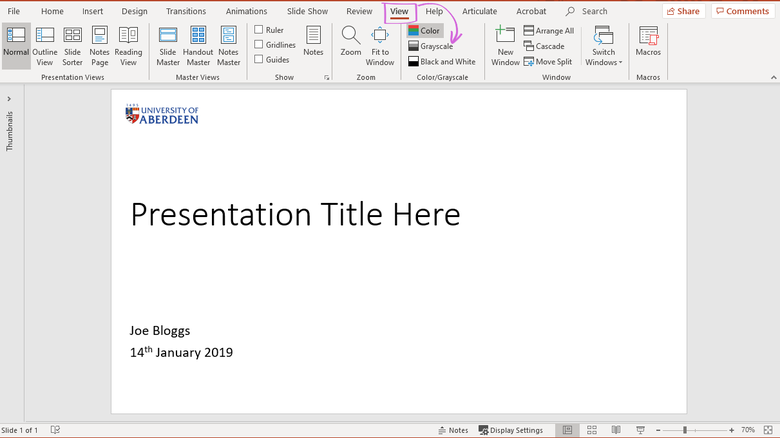
Printing a colourful document on a black and white printer can be a challenge. Check how your presentation looks when printed in black and white by selecting the View tab in the PowerPoint ribbon. From there, you can switch between colour/greyscale/black and white. In addition, you can select whether elements of your slides are printed in grey, black or omitted altogether. You can then rest assured that students will see the important elements clearly even if the colours change.
- Good Contrast
-
When producing content, it is important to choose colours that make the content easy to read and perceive by everyone. Effective use of colour will improve the experience for all users, but is especially important for people with colour vision deficiency or other visual impairments.
The new Public Sector Bodies Accessibility Regulations 2018 require any website or mobile app, including content uploaded to MyAberdeen, to meet the international WCAG 2.1 AA accessibility standard. You should therefore ensure that when creating content:
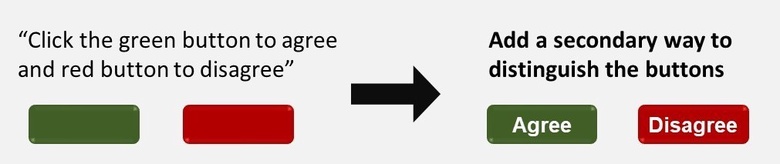
- There is sufficient contrast between text and background

- Don't use only colour to convey meaning
Further resources
- Use a colour contrast checker, e.g. from WebAIM, to evaluate your choice of colours.
- More information about accessible use of colour by Lighthouse International
- Accessible Tables in Word
-
How to Create Accessible Tables in Word
Tables in Word are used to display tabular information. Accessibility issues arise when:
- Tables are used for layout, for example, to display text and images in a specific way.
- Tables have nested tables, or split and merged cells
Identify the Header Row
If you are using a table to display data, you will need to identify the header row. Select the cells of the header row, then right click and select Table Properties. Navigate to Row tab, and tick Repeat as header row at the top of each page and un-tick Allow row to break across pages. This video by Microsoft also explains the process.
Identifying the header row will allow the screen reader to read the table correctly. You will not see any visible difference, unless the table spans across more than one page.
For more information, check the Writing Accessible Documents guide.
- Making Images Accessible
-
Making Images Accessible
Images often provide essential visual information or add clarity to concepts. As users with visual impairments or low bandwidth will not be able to view an image in your document you must provide alternative text (Alt Text).
How to add Alt Text in MS Office
- Right-click an image, shape, chart or other object
- Select "Edit Alt Text"
- Type in the description or tick "Mark as decorative"

How to add Alt Text in MyAberdeen
When uploading an image to MyAberdeen, you can add an alternative text/image description.

When is Alt Text required?
Alt text is especially important for images, charts and graphs that are critical to understanding. If the reader can't get the same information from the surrounding text as what the image is conveying, then a detailed description should be added.
If the image is simply decorative or the information is already included in the text around the image, mark the image as decorative so that screen readers will know to skip these images.
Further information
- Writing an Accessible Document guide includes examples of writing alt text
- Poet Training Tool provides an in-depth guidance for describing images
- Heading Styles
-
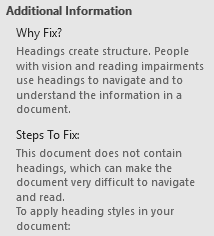
Structuring your documents using Heading Styles in Microsoft Word and other Office products improves the accessibility of your document. Screen reader users especially rely on the heading structure to navigate Word documents, as demonstrated in this video by Assistive Technology Showcase.
Using Styles will also make editing the document much easier for you:
- It's quicker and easier to apply a Heading Style than change each parameter (e.g font, size, colour) manually each time
- Table of contents can be automatically created if you have used Styles to format your document
- Changes to fonts, sizes and colours of text can quickly be applied to the whole document by modifying the Styles
- Converting a properly formatted Word document to PDF, ensures the PDF also retains the heading structure
The Styles panel can be accessed from the Home tab.

- Accessibility Checker in Microsoft Word
-
Using Accessibility Checker in Microsoft Word
It is important that learning materials and other documentation we produce are accessible to all users, including people using assistive technologies such as screen readers.
Microsoft Word includes a built-in Accessibility Checker tool, which provides a list of potential accessibility issues and suggestions on how to fix them. This is especially useful for highlighting missing alternative text on images and graphs.
How to use the Accessibility Checker
- In your Microsoft Word document, Open Accessibility Checker from Review tab.

- Use the drop down menu to quickly fix issues, for example, add a description (alt text) to images in a document.

- Accessibility Checker will provide information and instructions on how to fix each of the issues highlighted.
Accessibility Checker is also available in other Microsoft Office products, for example, in PowerPoint it can be used to quickly highlight slides missing a Title. Visit the Microsoft Support pages for more information.
- Accessible Hyperlinks
-
Accessible Hyperlinks - Why You Shouldn't Use "Click Here"
Embedding hyperlinks using meaningful and concise text is one of the easiest ways to improve the overall accessibility of your documents and learning materials. This way both sighted and screen reader users can quickly scan the page for links. Screen reader users often tab from link to link to get an idea of the content on a page, which is why using text such as "click here" or "read more" is not recommended.
To create accessible hyperlinks:
- Embed the URL into the text on the page.
- Use descriptive and meaningful text as the hyperlink.

We recommend watching this excellent 2-minute video on Creating meaningful hyperlinks that people understand by Microsoft.